Thứ Năm, 9 tháng 1, 2020

The basics of InnoDB space file layout

In On learning InnoDB: A journey to the core, I introduced the innodb_diagramsproject to document the InnoDB internals, which provides the diagrams used in this post.
InnoDB’s data storage model uses “spaces”, often called “tablespaces” in the context of MySQL, and sometimes called “file spaces” in InnoDB itself. A space may consist of multiple actual files at the operating system level (e.g. ibdata1ibdata2, etc.) but it is just a single logical file — multiple physical files are just treated as though they were physically concatenated together.
Each space in InnoDB is assigned a 32-bit integer space ID, which is used in many different places to refer to the space. InnoDB always has a “system space”, which is always assigned the space ID of 0. The system space is used for various special bookkeeping that InnoDB requires. Through MySQL, InnoDB currently only supports additional spaces in the form of “file per table” spaces, which create an .ibd file for each MySQL table. Internally, this .ibd file is actually a fully functional space which could contain multiple tables, but in the implementation with MySQL, they will only contain a single table.

Pages

Each space is divided into pages, normally 16 KiB each (this can differ for two reasons: if the compile-time define UNIV_PAGE_SIZE is changed, or if InnoDB compression is used). Each page within a space is assigned a 32-bit integer page number, often called “offset”, which is actually just the page’s offset from the beginning of the space (not necessarily the file, for multi-file spaces). So, page 0 is located at file offset 0, page 1 at file offset 16384, and so on. (The astute may remember that InnoDB has a limit of 64TiB of data; this is actually a limit per space, and is due primarily to the page number being a 32-bit integer combined with the default page size: 232 x 16 KiB = 64 TiB.)
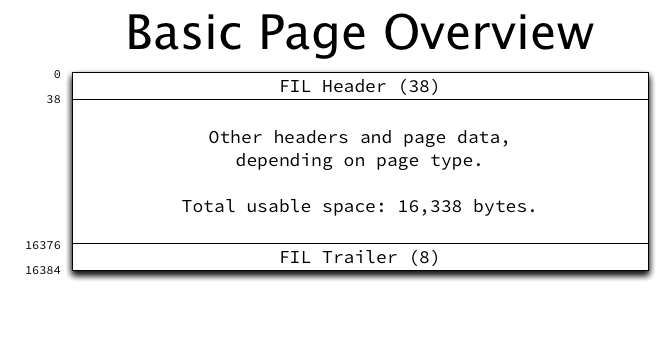
A page is laid out as follows:
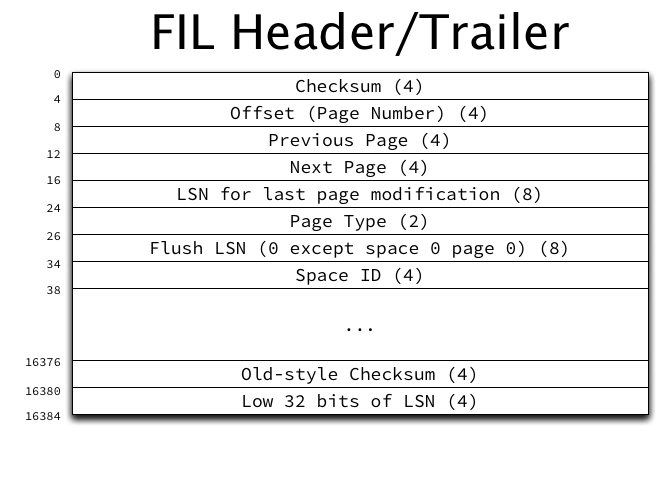
Every page has a 38-byte FIL header and 8-byte FIL trailer (FIL is a shortened form of “file”). The header contains a field which is used to indicate the page type, which determines the structure of the rest of the page. The structure of the FIL header and trailer are:
The FIL header and trailer contain the following structures (not in order):
  • The page type is stored in the header. This is necessary in order to parse the rest of the page data. Pages are allocated for file space management, extent management, the transaction system, the data dictionary, undo logs, blobs, and of course indexes (table data).
  • The space ID is stored in the header.
  • The page number is stored in the header once the page has been initialized. Checking that the page number read from that field matches what it should be based on the offset into the file is helpful to indicate that reading is correct, and this field being initialized indicates that the page has been initialized.
  • A 32-bit checksum is stored in the header, and an older format (and broken) 32-bit checksum is stored in the trailer. The older checksum could be deprecated and that space reclaimed at some point.
  • Pointers to the logical previous and next page for this page type are stored in the header. This allows doubly-linked lists of pages to be built, and this is used for INDEX pages to link all pages at the same level, which allows for e.g. full index scans to be efficient. Many page types do not use these fields.
  • The 64-bit log sequence number (LSN) of the last modification of the page is stored in the header, and the low 32-bits of the same LSN are stored in the trailer.
  • A 64-bit “flush LSN” field is stored in the header, which is actually only populated for a single page in the entire system, page 0 of space 0. This stores the highest LSN flushed to any page in the entire system (all spaces). This field is a great candidate for re-use in the rest of the space.

Space files

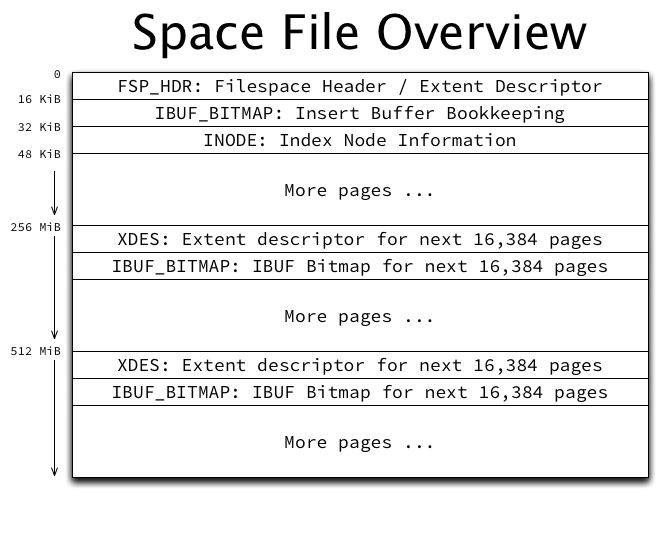
A space file is just a concatenation of many (up to 232) pages. For more efficient management, pages are grouped into blocks of 1 MiB (64 contiguous pages with the default page size of 16 KiB), and called an “extent”. Many structures then refer only to extents to allocate pages within a space.
InnoDB needs to do some bookkeeping to keep track of all of the pages, extents, and the space itself, so a space file has some mandatory super-structure:
The first page (page 0) in a space is always an FSP_HDR or “file space header” page. The FSP_HDR page contains (confusingly) an FSP header structure, which tracks things like the size of the space and lists of free, fragmented, and full extents. (A more detailed discussion of free space management is reserved for a future post.)
An FSP_HDR page only has enough space internally to store bookkeeping information for 256 extents (or 16,384 pages, 256 MiB), so additional space must be reserved every 16,384 pages for bookkeeping information in the form of an XDESpage. The structure of XDES and FSP_HDR pages is identical, except that the FSPheader structure is zeroed-out in XDES pages. These additional pages are allocated automatically as a space file grows.
The third page in each space (page 2) will be an INODE page, which is used to store lists related to file segments (groupings of extents plus an array of singly-allocated “fragment” pages). Each INODE page can store 85 INODE entries, and each index requires two INODE entries. (A more detailed discussion of INODE entries and file segments is reserved for a future post.)
Alongside each FSP_HDR or XDES page will also be an IBUF_BITMAP page, which is used for bookkeeping information related to insert buffering, and is outside the scope of this post.

The system space

The system space (space 0) is special in InnoDB, and contains quite a few pages allocated at fixed page numbers to store a wide range of information critical to InnoDB’s operation. Since the system space is a space like any other, it has the required FSP_HDRIBUF_BITMAP, and INODE pages allocated as its first three pages. After that, it is a bit special:
The following pages are allocated:
  • Page 3, type SYS: Headers and bookkeeping information related to insert buffering.
  • Page 4, type INDEX: The root page of the index structure used for insert buffering.
  • Page 5, type TRX_SYS: Information related to the operation of InnoDB’s transaction system, such as the latest transaction ID, MySQL binary log information, and the location of the double write buffer extents.
  • Page 6, type SYS: The first rollback segment page. Additional pages (or whole extents) are allocated as needed to store rollback segment data.
  • Page 7, type SYS: Headers related to the data dictionary, containing root page numbers for the indexes that make up the data dictionary. This information is required to be able to find any other indexes (tables), as their root page numbers are stored in the data dictionary itself.
  • Pages 64-127: The first block of 64 pages (an extent) in the double write buffer. The double write buffer is used as part of InnoDB’s recovery mechanism.
  • Pages 128-191: The second block of the double write buffer.
All other pages are allocated on an as-needed basis to indexes, rollback segments, undo logs, etc.

Per-table space files

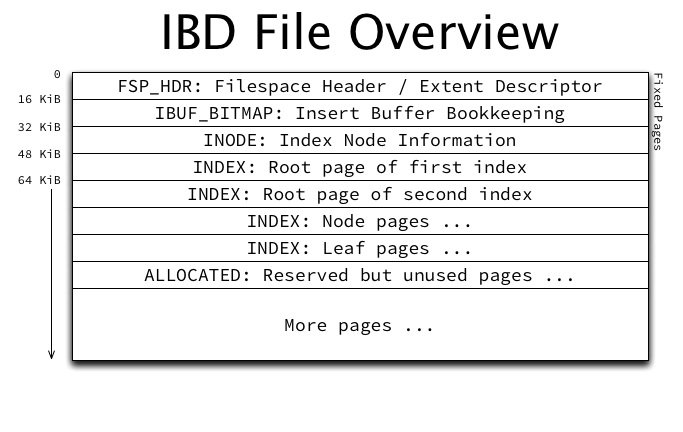
InnoDB offers a “file per table” mode, which will create a file (which as explained above is actually a space) for each MySQL table created. A better name for this feature may be “space per table” rather than “file per table”. The .ibd file created for each table has the typical space file structure:
Ignoring “fast index creation” which adds indexes at runtime, after the requisite 3 initial pages, the next pages allocated in the space will be the root pages of each index in the table, in the order they were defined in the table creation. Page 3 will be the root of the clustered index, Page 4 will be the root of the first secondary key, etc.
Since most of InnoDB’s bookkeeping structures are stored in the system space, most pages allocated in a per-table space will be of type INDEX and store table data.
https://blog.jcole.us/2013/01/03/the-basics-of-innodb-space-file-layout/

Thứ Sáu, 13 tháng 12, 2019

SEO resource

https://www.facebook.com/groups/hoidapseovincentdo/permalink/2401678806765527/ ONPAGE - ONSITE + https://www.link-assistant.com/n…/6-seo-trends-for-2018.html + https://searchengineland.com/enhance-google-knowledge-graph… + https://searchengineland.com/…/google/google-knowledge-graph + https://www.searchenginejournal.com/image-optimizat…/207416/ + https://searchengineland.com/performing-manual-backlink-aud… + https://backlinko.com/seo-checklist + https://www.youtube.com/watch?v=aZCIbskIFkk + https://searchengineland.com/how-to-use-the-knowledge-graph… + https://backlinko.com/increase-website-traffic + https://backlinko.com/on-page-seo + https://backlinko.com/seo-techniques + https://backlinko.com/mobile-seo-guide + https://backlinko.com/keyword-research + https://backlinko.com/seo-strategy + https://backlinko.com/google-rankbrain-seo + https://www.searchenginejournal.com/how-will-googles-amp…/…/ + https://backlinko.com/actionable-seo-tips + https://backlinko.com/google-ranking-factors + https://backlinko.com/google-rankbrain-seo + http://www.seobythesea.com/…/how-google-might-identify-pri…/ BONUS + https://www.seoptimer.com/blog/keyword-consistency/ + https://moz.com/…/identify-and-tackle-keyword-cannibalisati… + https://webmasters.googleblog.com/…/using-page-speed-in-mob… + https://neilpatel.com/…/the-definitive-strategy-for-drivin…/ + https://searchengineland.com/schema-markup-structured-data-… + https://searchengineland.com/…/search-engine…/schema-dot-org AUDIT SEO : https://optinmonster.com/seo-audit/ https://ahrefs.com/blog/seo-audit/ https://webris.org/how-to-perform-a-technical-seo-audit/ LINK Building : https://backlinko.com/link-building https://www.gotchseo.com/backlinks/ http://pointblankseo.com/link-building-strategies + https://moz.com/beginners-guide-to-link-building/ +https://moz.com/…/the-6-month-link-building-plan-for-an-est… + http://www.onblastblog.com/link-building-guide/ +https://www.hobo-web.co.uk/link-building-strategy-for-begi…/ + https://www.outreachmama.com/backlinks/ + https://searchengineland.com/syndicated-content-189097

Thứ Hai, 19 tháng 8, 2019

3d rotate slide

Chủ Nhật, 5 tháng 5, 2019

DDoS Protection With IPtables: The Ultimate Guide


copy from source https://javapipe.com/blog/iptables-ddos-protection/

DDoS Protection With IPtables: The Ultimate Guide

iptables DDoS Protection
There are different ways of building your own anti-DDoS rules for iptables. We will be discussing the most effective iptables DDoS protection methods in this comprehensive tutorial.
This guide will teach you how to:
  1. Select the best iptables table and chain to stop DDoS attacks
  2. Tweak your kernel settings to mitigate the effects of DDoS attacks
  3. Use iptables to block most TCP-based DDoS attacks
  4. Use iptables SYNPROXY to block SYN floods
Please note that this article is written for professionals who deal with Linux servers on a daily basis.
If you just want to protect your online application from DDoS attacks, you can use our remote protection, a VPS with DDoS protection or a DDoS protected bare metal server.
While one can do a lot with iptables to block DDoS attacks, there isn’t a way around actual hardware firewalls (we recently reviewed RioRey DDoS mitigation hardware) to detect and stop large DDoS floods.
However, it isn’t impossible to filter most bad traffic at line rate using iptables!
We’ll only cover protection from TCP-based attacks. Most UDP-based attacks are amplified reflection attacks that will exhaust the network interface card of any common server.
The only mitigation approach that makes sense against these types of attacks is to block them at the edge or core network or even at the carrier already.
Did you know we now offer unmetered bandwidth VPS plans with DDoS protection in Chicago, Illinois and Bucharest, Romania?
If they are able to reach your server, there isn’t much you can do against those multi-Gbit/s attacks except to move to a DDoS protected network.
anti-DDoS iptables

What Is IPtables?

netfilter iptables (soon to be replaced by nftables) is a user-space command line utility to configure kernel packet filtering rules developed by netfilter.
It’s the default firewall management utility on Linux systems – everyone working with Linux systems should be familiar with it or have at least heard of it.
iptables can be used to filter certain packets, block source or destination ports and IP addresses, forward packets via NAT and a lot of other things.
Most commonly it’s used to block destination ports and source IP addresses.

Why Your IPtables Anti-DDoS Rules Suck

To understand why your current iptables rules to prevent DDoS attacks suck, we first have to dig into how iptables works.
iptables is a command line tool used to set up and control the tables of IP packet filter rules. There are different tables for different purposes.

IPtables Tables

Filter: The filter table is the default and most commonly used table that rules go to if you don’t use the -t (–table) option.
Nat: This table is used for Network Address Translation (NAT). If a packet creates a new connection, the nat table gets checked for rules.
Mangle: The mangle table is used to modify or mark packets and their header information.
Raw: This table’s purpose is mainly to exclude certain packets from connection tracking using the NOTRACK target.
As you can see there are four different tables on an average Linux system that doesn’t have non-standard kernel modules loaded. Each of these tables supports a different set of iptables chains.

IPtables Chains

PREROUTING: raw, nat, mangle
  • Applies to packets that enter the network interface card (NIC)
INPUT: filter, mangle
  • Applies to packets destined to a local socket
FORWARD: filter, mangle
  • Applies to packets that are being routed through the server
OUTPUT: raw, filter, nat, mangle
  • Applies to packets that the server sends (locally generated)
POSTROUTING: nat, mangle
  • Applies to packets that leave the server
Depending on what kind of packets you want to block or modify, you select a certain iptables table and a chain that the selected table supports.
Of course, we’re still missing an explanation of iptables targets (ACCEPT, DROP, REJECT, etc.), but we’re assuming that if you’re reading this article, you already know how to deal with iptables.
We’re going to explain why your iptables rules suck to stop DDoS and not teach you how to use iptables. Let’s get back to that.
If you want to block a DDoS attack with iptables, performance of the iptables rules is extremely important. Most TCP-based DDoS attack types use a high packet rate, meaning the sheer number of packets per second is what causes the server to go down.
That’s why you want to make sure that you can process and block as many packets per second as possible.
You’ll find that most if not all guides on how to block DDoS attacks using iptables use the filter table and the INPUT chain for anti-DDoS rules.
The issue with this approach is that the INPUT chain is only processed after the PREROUTING and FORWARD chains and therefore only applies if the packet doesn’t match any of these two chains.
This causes a delay in the filtering of the packet which consumes resources. In conclusion, to make our rules as effective as possible, we need to move our anti-DDoS rules as far up the chains as possible.
The first chain that can apply to a packet is the PREROUTING chain, so ideally we’ll want to filter the bad packets in this chain already.
However, the filter table doesn’t support the PREROUTING chain. To get around this problem, we can simply use the mangle table instead of the filter table for our anti-DDoS iptables rules.
It supports most if not all rules that the filter table supports while also supporting all iptables chains.
So you want to know why your iptables DDoS protection rules suck? It’s because you use the filter table and the INPUT chain to block the bad packets!
The best solution to dramatically increase the performance of your iptables rules and therefore the amount of (TCP) DDoS attack traffic they can filter is to use the mangle table and the PREROUTING chain!

The Best Linux Kernel Settings to Mitigate DDoS

Another common mistake is that people don’t use optimized kernel settings to better mitigate the effects of DDoS attacks.
Note that this guide focuses on CentOS 7 as the operating system of choice. CentOS 7 includes a recent version of iptables and support of the new SYNPROXY target.
We won’t cover every single kernel setting that you need to adjust in order to better mitigate DDoS with iptables.
Instead, we provide a set of CentOS 7 kernel settings that we would use. Just put the below in your /etc/sysctl.conf file and apply the settings with sysctl -p.

Anti-DDoS Kernel Settings (sysctl.conf)

kernel.printk = 4 4 1 7 
kernel.panic = 10 
kernel.sysrq = 0 
kernel.shmmax = 4294967296 
kernel.shmall = 4194304 
kernel.core_uses_pid = 1 
kernel.msgmnb = 65536 
kernel.msgmax = 65536 
vm.swappiness = 20 
vm.dirty_ratio = 80 
vm.dirty_background_ratio = 5 
fs.file-max = 2097152 
net.core.netdev_max_backlog = 262144 
net.core.rmem_default = 31457280 
net.core.rmem_max = 67108864 
net.core.wmem_default = 31457280 
net.core.wmem_max = 67108864 
net.core.somaxconn = 65535 
net.core.optmem_max = 25165824 
net.ipv4.neigh.default.gc_thresh1 = 4096 
net.ipv4.neigh.default.gc_thresh2 = 8192 
net.ipv4.neigh.default.gc_thresh3 = 16384 
net.ipv4.neigh.default.gc_interval = 5 
net.ipv4.neigh.default.gc_stale_time = 120 
net.netfilter.nf_conntrack_max = 10000000 
net.netfilter.nf_conntrack_tcp_loose = 0 
net.netfilter.nf_conntrack_tcp_timeout_established = 1800 
net.netfilter.nf_conntrack_tcp_timeout_close = 10 
net.netfilter.nf_conntrack_tcp_timeout_close_wait = 10 
net.netfilter.nf_conntrack_tcp_timeout_fin_wait = 20 
net.netfilter.nf_conntrack_tcp_timeout_last_ack = 20 
net.netfilter.nf_conntrack_tcp_timeout_syn_recv = 20 
net.netfilter.nf_conntrack_tcp_timeout_syn_sent = 20 
net.netfilter.nf_conntrack_tcp_timeout_time_wait = 10 
net.ipv4.tcp_slow_start_after_idle = 0 
net.ipv4.ip_local_port_range = 1024 65000 
net.ipv4.ip_no_pmtu_disc = 1 
net.ipv4.route.flush = 1 
net.ipv4.route.max_size = 8048576 
net.ipv4.icmp_echo_ignore_broadcasts = 1 
net.ipv4.icmp_ignore_bogus_error_responses = 1 
net.ipv4.tcp_congestion_control = htcp 
net.ipv4.tcp_mem = 65536 131072 262144 
net.ipv4.udp_mem = 65536 131072 262144 
net.ipv4.tcp_rmem = 4096 87380 33554432 
net.ipv4.udp_rmem_min = 16384 
net.ipv4.tcp_wmem = 4096 87380 33554432 
net.ipv4.udp_wmem_min = 16384 
net.ipv4.tcp_max_tw_buckets = 1440000 
net.ipv4.tcp_tw_recycle = 0 
net.ipv4.tcp_tw_reuse = 1 
net.ipv4.tcp_max_orphans = 400000 
net.ipv4.tcp_window_scaling = 1 
net.ipv4.tcp_rfc1337 = 1 
net.ipv4.tcp_syncookies = 1 
net.ipv4.tcp_synack_retries = 1 
net.ipv4.tcp_syn_retries = 2 
net.ipv4.tcp_max_syn_backlog = 16384 
net.ipv4.tcp_timestamps = 1 
net.ipv4.tcp_sack = 1 
net.ipv4.tcp_fack = 1 
net.ipv4.tcp_ecn = 2 
net.ipv4.tcp_fin_timeout = 10 
net.ipv4.tcp_keepalive_time = 600 
net.ipv4.tcp_keepalive_intvl = 60 
net.ipv4.tcp_keepalive_probes = 10 
net.ipv4.tcp_no_metrics_save = 1 
net.ipv4.ip_forward = 0 
net.ipv4.conf.all.accept_redirects = 0 
net.ipv4.conf.all.send_redirects = 0 
net.ipv4.conf.all.accept_source_route = 0 
net.ipv4.conf.all.rp_filter = 1
These sysctl.conf settings help to maximize the performance of your server under DDoS as well as the effectiveness of the iptables rules that we’re going to provide in this guide.

The Actual IPtables Anti-DDoS Rules

Considering you now know that you need to use the mangle table and the PREROUTING chain as well as optimized kernel settings to mitigate the effects of DDoS attacks, we’ll now move on to a couple of example rules to mitigate most TCP DDoS attacks.
DDoS attacks are complex.
There are many different types of DDoS and it’s close to impossible to maintain signature-based rules against all of them.
But luckily there is something called connection tracking (nf_conntrack kernel module), which can help us to mitigate almost any TCP-based DDoS attack that doesn’t use SYN packets that seem legitimate.
This includes all types of ACK and SYN-ACK DDoS attacks as well as DDoS attacks that use bogus TCP flags.
We’ll start with just five simple iptables rules that will already drop many TCP-based DDoS attacks.

Block Invalid Packets

iptables -t mangle -A PREROUTING -m conntrack --ctstate INVALID -j DROP
This rule blocks all packets that are not a SYN packet and don’t belong to an established TCP connection.

Block New Packets That Are Not SYN

iptables -t mangle -A PREROUTING -p tcp ! --syn -m conntrack --ctstate NEW -j DROP
This blocks all packets that are new (don’t belong to an established connection) and don’t use the SYN flag. This rule is similar to the “Block Invalid Packets” one, but we found that it catches some packets that the other one doesn’t.

Block Uncommon MSS Values

iptables -t mangle -A PREROUTING -p tcp -m conntrack --ctstate NEW -m tcpmss ! --mss 536:65535 -j DROP
The above iptables rule blocks new packets (only SYN packets can be new packets as per the two previous rules) that use a TCP MSS value that is not common. This helps to block dumb SYN floods.

Block Packets With Bogus TCP Flags

iptables -t mangle -A PREROUTING -p tcp --tcp-flags FIN,SYN,RST,PSH,ACK,URG NONE -j DROP 
iptables -t mangle -A PREROUTING -p tcp --tcp-flags FIN,SYN FIN,SYN -j DROP 
iptables -t mangle -A PREROUTING -p tcp --tcp-flags SYN,RST SYN,RST -j DROP 
iptables -t mangle -A PREROUTING -p tcp --tcp-flags FIN,RST FIN,RST -j DROP 
iptables -t mangle -A PREROUTING -p tcp --tcp-flags FIN,ACK FIN -j DROP 
iptables -t mangle -A PREROUTING -p tcp --tcp-flags ACK,URG URG -j DROP 
iptables -t mangle -A PREROUTING -p tcp --tcp-flags ACK,FIN FIN -j DROP 
iptables -t mangle -A PREROUTING -p tcp --tcp-flags ACK,PSH PSH -j DROP 
iptables -t mangle -A PREROUTING -p tcp --tcp-flags ALL ALL -j DROP 
iptables -t mangle -A PREROUTING -p tcp --tcp-flags ALL NONE -j DROP 
iptables -t mangle -A PREROUTING -p tcp --tcp-flags ALL FIN,PSH,URG -j DROP 
iptables -t mangle -A PREROUTING -p tcp --tcp-flags ALL SYN,FIN,PSH,URG -j DROP 
iptables -t mangle -A PREROUTING -p tcp --tcp-flags ALL SYN,RST,ACK,FIN,URG -j DROP
The above ruleset blocks packets that use bogus TCP flags, ie. TCP flags that legitimate packets wouldn’t use.

Block Packets From Private Subnets (Spoofing)

iptables -t mangle -A PREROUTING -s 224.0.0.0/3 -j DROP 
iptables -t mangle -A PREROUTING -s 169.254.0.0/16 -j DROP 
iptables -t mangle -A PREROUTING -s 172.16.0.0/12 -j DROP 
iptables -t mangle -A PREROUTING -s 192.0.2.0/24 -j DROP 
iptables -t mangle -A PREROUTING -s 192.168.0.0/16 -j DROP 
iptables -t mangle -A PREROUTING -s 10.0.0.0/8 -j DROP 
iptables -t mangle -A PREROUTING -s 0.0.0.0/8 -j DROP 
iptables -t mangle -A PREROUTING -s 240.0.0.0/5 -j DROP 
iptables -t mangle -A PREROUTING -s 127.0.0.0/8 ! -i lo -j DROP
These rules block spoofed packets originating from private (local) subnets. On your public network interface you usually don’t want to receive packets from private source IPs.
These rules assume that your loopback interface uses the 127.0.0.0/8 IP space.
These five sets of rules alone already block many TCP-based DDoS attacks at very high packet rates.
With the kernel settings and rules mentioned above, you’ll be able to filter ACK and SYN-ACK attacks at line rate.

Additional Rules

iptables -t mangle -A PREROUTING -p icmp -j DROP
This drops all ICMP packets. ICMP is only used to ping a host to find out if it’s still alive. Because it’s usually not needed and only represents another vulnerability that attackers can exploit, we block all ICMP packets to mitigate Ping of Death (ping flood), ICMP flood and ICMP fragmentation flood.
iptables -A INPUT -p tcp -m connlimit --connlimit-above 80 -j REJECT --reject-with tcp-reset
This iptables rule helps against connection attacks. It rejects connections from hosts that have more than 80 established connections. If you face any issues you should raise the limit as this could cause troubles with legitimate clients that establish a large number of TCP connections.
iptables -A INPUT -p tcp -m conntrack --ctstate NEW -m limit --limit 60/s --limit-burst 20 -j ACCEPT 
iptables -A INPUT -p tcp -m conntrack --ctstate NEW -j DROP
Limits the new TCP connections that a client can establish per second. This can be useful against connection attacks, but not so much against SYN floods because the usually use an endless amount of different spoofed source IPs.
iptables -t mangle -A PREROUTING -f -j DROP
This rule blocks fragmented packets. Normally you don’t need those and blocking fragments will mitigate UDP fragmentation flood. But most of the time UDP fragmentation floods use a high amount of bandwidth that is likely to exhaust the capacity of your network card, which makes this rule optional and probably not the most useful one.
iptables -A INPUT -p tcp --tcp-flags RST RST -m limit --limit 2/s --limit-burst 2 -j ACCEPT 
iptables -A INPUT -p tcp --tcp-flags RST RST -j DROP
This limits incoming TCP RST packets to mitigate TCP RST floods. Effectiveness of this rule is questionable.

Mitigating SYN Floods With SYNPROXY

SYNPROXY is a new target of iptables that has been added in Linux kernel version 3.12 and iptables 1.4.21. CentOS 7 backported the feature and it’s available in its 3.10 default kernel.
The purpose of SYNPROXY is to check whether the host that sent the SYN packet actually establishes a full TCP connection or just does nothing after it sent the SYN packet.
If it does nothing, it discards the packet with minimal performance impact.
While the iptables rules that we provided above already block most TCP-based attacks, the attack type that can still slip through them if sophisticated enough is a SYN flood.
It’s important to note that the performance of the rules will always be better if we find a certain pattern or signature to block, such as packet length (-m length), TOS (-m tos), TTL (-m ttl) or strings and hex values (-m string and -m u32 for the more advanced users).
But in some rare cases that’s not possible or at least not easy to achieve. So, in these cases, you can make use of SYNPROXY.
Here are iptables SYNPROXY rules that help mitigate SYN floods that bypass our other rules:
iptables -t raw -A PREROUTING -p tcp -m tcp --syn -j CT --notrack 
iptables -A INPUT -p tcp -m tcp -m conntrack --ctstate INVALID,UNTRACKED -j SYNPROXY --sack-perm --timestamp --wscale 7 --mss 1460 
iptables -A INPUT -m conntrack --ctstate INVALID -j DROP
These rules apply to all ports. If you want to use SYNPROXY only on certain TCP ports that are active (recommended – also you should block all TCP ports that are not in use using the mangle table and PREROUTING chain), you can just add –dport 80 to each of the rules if you want to use SYNPROXY on port 80 only.
To verify that SYNPROXY is working, you can do watch -n1 cat /proc/net/stat/synproxy. If the values change when you establish a new TCP connection to the port you use SYNPROXY on, it works.

The Complete IPtables Anti-DDoS Rules

If you don’t want to copy & paste each single rule we discussed in this article, you can use the below ruleset for basic DDoS protection of your Linux server.
### 1: Drop invalid packets ### 
/sbin/iptables -t mangle -A PREROUTING -m conntrack --ctstate INVALID -j DROP  

### 2: Drop TCP packets that are new and are not SYN ### 
/sbin/iptables -t mangle -A PREROUTING -p tcp ! --syn -m conntrack --ctstate NEW -j DROP 
 
### 3: Drop SYN packets with suspicious MSS value ### 
/sbin/iptables -t mangle -A PREROUTING -p tcp -m conntrack --ctstate NEW -m tcpmss ! --mss 536:65535 -j DROP  

### 4: Block packets with bogus TCP flags ### 
/sbin/iptables -t mangle -A PREROUTING -p tcp --tcp-flags FIN,SYN,RST,PSH,ACK,URG NONE -j DROP 
/sbin/iptables -t mangle -A PREROUTING -p tcp --tcp-flags FIN,SYN FIN,SYN -j DROP 
/sbin/iptables -t mangle -A PREROUTING -p tcp --tcp-flags SYN,RST SYN,RST -j DROP 
/sbin/iptables -t mangle -A PREROUTING -p tcp --tcp-flags FIN,RST FIN,RST -j DROP 
/sbin/iptables -t mangle -A PREROUTING -p tcp --tcp-flags FIN,ACK FIN -j DROP 
/sbin/iptables -t mangle -A PREROUTING -p tcp --tcp-flags ACK,URG URG -j DROP 
/sbin/iptables -t mangle -A PREROUTING -p tcp --tcp-flags ACK,FIN FIN -j DROP 
/sbin/iptables -t mangle -A PREROUTING -p tcp --tcp-flags ACK,PSH PSH -j DROP 
/sbin/iptables -t mangle -A PREROUTING -p tcp --tcp-flags ALL ALL -j DROP 
/sbin/iptables -t mangle -A PREROUTING -p tcp --tcp-flags ALL NONE -j DROP 
/sbin/iptables -t mangle -A PREROUTING -p tcp --tcp-flags ALL FIN,PSH,URG -j DROP 
/sbin/iptables -t mangle -A PREROUTING -p tcp --tcp-flags ALL SYN,FIN,PSH,URG -j DROP 
/sbin/iptables -t mangle -A PREROUTING -p tcp --tcp-flags ALL SYN,RST,ACK,FIN,URG -j DROP  

### 5: Block spoofed packets ### 
/sbin/iptables -t mangle -A PREROUTING -s 224.0.0.0/3 -j DROP 
/sbin/iptables -t mangle -A PREROUTING -s 169.254.0.0/16 -j DROP 
/sbin/iptables -t mangle -A PREROUTING -s 172.16.0.0/12 -j DROP 
/sbin/iptables -t mangle -A PREROUTING -s 192.0.2.0/24 -j DROP 
/sbin/iptables -t mangle -A PREROUTING -s 192.168.0.0/16 -j DROP 
/sbin/iptables -t mangle -A PREROUTING -s 10.0.0.0/8 -j DROP 
/sbin/iptables -t mangle -A PREROUTING -s 0.0.0.0/8 -j DROP 
/sbin/iptables -t mangle -A PREROUTING -s 240.0.0.0/5 -j DROP 
/sbin/iptables -t mangle -A PREROUTING -s 127.0.0.0/8 ! -i lo -j DROP  

### 6: Drop ICMP (you usually don't need this protocol) ### 
/sbin/iptables -t mangle -A PREROUTING -p icmp -j DROP  

### 7: Drop fragments in all chains ### 
/sbin/iptables -t mangle -A PREROUTING -f -j DROP  

### 8: Limit connections per source IP ### 
/sbin/iptables -A INPUT -p tcp -m connlimit --connlimit-above 111 -j REJECT --reject-with tcp-reset  

### 9: Limit RST packets ### 
/sbin/iptables -A INPUT -p tcp --tcp-flags RST RST -m limit --limit 2/s --limit-burst 2 -j ACCEPT 
/sbin/iptables -A INPUT -p tcp --tcp-flags RST RST -j DROP  

### 10: Limit new TCP connections per second per source IP ### 
/sbin/iptables -A INPUT -p tcp -m conntrack --ctstate NEW -m limit --limit 60/s --limit-burst 20 -j ACCEPT 
/sbin/iptables -A INPUT -p tcp -m conntrack --ctstate NEW -j DROP  

### 11: Use SYNPROXY on all ports (disables connection limiting rule) ### 
# Hidden - unlock content above in "Mitigating SYN Floods With SYNPROXY" section

Bonus Rules

Here are some more iptables rules that are useful to increase the overall security of a Linux server:
### SSH brute-force protection ### 
/sbin/iptables -A INPUT -p tcp --dport ssh -m conntrack --ctstate NEW -m recent --set 
/sbin/iptables -A INPUT -p tcp --dport ssh -m conntrack --ctstate NEW -m recent --update --seconds 60 --hitcount 10 -j DROP  

### Protection against port scanning ### 
/sbin/iptables -N port-scanning 
/sbin/iptables -A port-scanning -p tcp --tcp-flags SYN,ACK,FIN,RST RST -m limit --limit 1/s --limit-burst 2 -j RETURN 
/sbin/iptables -A port-scanning -j DROP

Conclusion

This tutorial demonstrates some of the most powerful and effective methods to stop DDoS attacks using iptables.
We’ve successfully mitigated DDoS attacks that peaked at multiple million packets per second using these iptables rules.
Every single guide on the same topic that we had researched provided inefficient methods to stop DDoS traffic or only a very limited number of iptables rules.
If used correctly, iptables is an extremely powerful tool that’s able to block different types of DDoS attacks at line-rate of 1GigE NICs and close to line-rate of 10GigE NICs.
Don’t underestimate the power of iptables!
Thứ Tư, 24 tháng 4, 2019

Cách Đăng Ký Adsense /Cách xác minh tài khoản GA

Copy from Facebook 
Vinh Hoang Duc

Chia Sẻ Kiến Thức về Google Adsense:
- Xin chào các bác. Nói trc mình ko phải Chuyên Gia hướng dẫn. Mà đơn giản là mình tự Seo, tự chơi Adsense. Hầu hết đều là Tự Làm nên không thể tránh khỏi những Sai Lầm đáng tiếc.
- Vì vậy những Sai Lầm của mình sẽ là Bài Học cho Newbie, tránh mất tiền Ngu  Đây là những kinh nghiệm 100% Thực Tế chứ không phải Lý Thuyết trong sách vở nhé. Hy vọng có ích với các bác 
*** 1, Cách Đăng Ký Adsense ***
- Như các bác đã biết, Con Gà của mình mới lăn ra chết trong thời gian vừa qua. Vì vậy mình có lấy vài con PBN để đem đi đăng ký (PBN khoảng 400-500 index, nội dung như *** vì ngày trc mình có mở bán VIP PBN nên bị ae Spam) ==> Lý do Google đưa ra là:
1) Nội dung cóp nhặt
2) Nội dung ko mang lại giá trị
- Sau đó mình lấy 1 con PBN khác (Chỉ có vài chục bài viết, do mình tự viết, ko Copy, 1 ngày chỉ khoảng 20-30 view thôi) ==> Kết Quả: Được Duyệt ngay lập tức.
===> Bài học cho các bác: Để đăng ký thành công Adsense: Chúng ta ko cần nhiều index, nhiều traffic. Chỉ cần nội dung Gốc, Ko Copy, Ko Spin các kiểu. Mang lại giá trị cho người dùng là đủ.
- Ngoài ra: web cần có những trang quan trọng như: Giới Thiệu, Điều Khoản, Liên Hệ. Giao diện dễ nhìn, điều hướng Menu hợp lý...
*** 2, Cách xác minh tài khoản GA ***
- UPDATE mới nhất 2019: Ở thời điểm hiện tại, sau khi đăng ký thành công GA và đạt ngưỡng 10$ chúng ta phải xác minh Danh Tính bằng CMND/Thẻ Căn Cước -> Rồi mới đến bước xác minh địa chỉ (PIN) - Lằng nhằng vkl.
- Nếu xác minh mà Tạch 3 lần thì coi như chết GÀ. và Đen như Chó. Mình gửi ảnh xác minh bị Từ Chối luôn. Lý do là:
1) Ảnh quá mờ
2) Ảnh quá nhỏ.
==> Bài học cho các bác khi chụp ảnh CMND/ Thẻ Căn Cước để xác minh danh tính như sau:
- Chụp ảnh gần gần chút sao cho to, rõ ràng, nhưng đặc biệt lưu ý: PHẢI CHỤP ẢNH NHÌN RÕ CẢ VIỀN nhé.
- Ko bật Flash, ảnh ko bị nhòe, bị mờ,... Tốt nhất là chụp vào ban ngày, nắng to, ko dùng app hỗ trợ. Nhớ là phải bật HD hoặc Full HD.
- Giữ nguyên dung lượng gốc, đừng nén, đừng chỉnh sửa, thay đổi, thêm bớt cái j.
- Vấn đề Địa Chỉ trong CMND có cần TRÙNG với Địa Chỉ nhận PIN đang là thắc mắc chưa đc giải đáp. (Khi nào mình xác minh thành công thì mới biết đc)
- Các bác lưu ý để có thể tự xác minh. Nếu đi thuê thì mất vài trăm K đấy. Sau khi xác minh danh tính xong qua bước nhận PIN thì đi thuê cũng đc. Vì nó rẻ. Khoảng 100k thôi.
*** 3, Cách kiếm tiền với Adsense ***
- Traffic thực, nội dung tốt. Nhiều view thì sẽ nhiều tiền. Nên tuân thủ theo chính sách của Google và tham khảo các đề xuất, hướng dẫn tăng doanh thu của nó.
- Mọi hành vi vi phạm, gian lận có thể giúp bạn kiếm đc Nhiều Tiền hơn bt. Nhưng bạn có thể Chết bất cứ lúc nào. Kể cả bạn chơi đúng Luật bạn cũng có thể Chết. Vì vậy lựa chọn chơi theo cách nào là ở bạn 

Chủ Nhật, 7 tháng 4, 2019

convert ppt,pptx, doc, docx to pdf with microsoft office programmatically (c#)

using System;
using System.Collections.Generic;
using System.Linq;
using System.Text;
using System.IO;
using Microsoft.Office.Interop.PowerPoint;
using Microsoft.Office.Interop.Word;
using Microsoft.Office.Core;
namespace ConsoleApplication1
{
    class Program
    {
        static void Main(string[] args)
        {
            //convertDoc();
            convertPpt();


        }
        static void convertDoc()
        {
            // Create a new Microsoft Word application object
            Microsoft.Office.Interop.Word.Application word = new Microsoft.Office.Interop.Word.Application();

            // C# doesn't have optional arguments so we'll need a dummy value
            object oMissing = System.Reflection.Missing.Value;

            // Get list of Word files in specified directory
            DirectoryInfo dirInfo = new DirectoryInfo(@"E:\copy");
            string fileType = "doc";
            FileInfo[] wordFiles = dirInfo.GetFiles("*." + fileType, SearchOption.AllDirectories);

            word.Visible = false;
            word.ScreenUpdating = false;
            System.Console.WriteLine("total " + wordFiles.Length);
            int count = 0;
            StringBuilder strBuilder = new StringBuilder();
            foreach (FileInfo wordFile in wordFiles)
            {
                try
                {
                    // Cast as Object for word Open method
                    Object filename = (Object)wordFile.FullName;
                    strBuilder.Append("start " + count + "/" + wordFiles.Length + " " + wordFile.FullName + Environment.NewLine);
                    System.Console.WriteLine("start " + count + "/" + wordFiles.Length + " " + wordFile.FullName);
                    // Use the dummy value as a placeholder for optional arguments
                    Document doc = word.Documents.Open(ref filename, ref oMissing,
                        ref oMissing, ref oMissing, ref oMissing, ref oMissing, ref oMissing,
                        ref oMissing, ref oMissing, ref oMissing, ref oMissing, ref oMissing,
                        ref oMissing, ref oMissing, ref oMissing, ref oMissing);
                    //doc.Activate();

                    object outputFileName = wordFile.FullName.Replace("." + fileType, ".pdf");
                    object fileFormat = WdSaveFormat.wdFormatPDF;

                    // Save document into PDF Format
                    doc.SaveAs(ref outputFileName,
                        ref fileFormat, ref oMissing, ref oMissing,
                        ref oMissing, ref oMissing, ref oMissing, ref oMissing,
                        ref oMissing, ref oMissing, ref oMissing, ref oMissing,
                        ref oMissing, ref oMissing, ref oMissing, ref oMissing);
                    strBuilder.Append("end " + count + "/" + wordFiles.Length + " " + wordFile.FullName + Environment.NewLine);
                    System.Console.WriteLine("end " + count + "/" + wordFiles.Length + " " + wordFile.FullName);
                    count++;
                    // Close the Word document, but leave the Word application open.
                    // doc has to be cast to type _Document so that it will find the
                    // correct Close method.             
                    object saveChanges = WdSaveOptions.wdDoNotSaveChanges;
                    ((_Document)doc).Close(ref saveChanges, ref oMissing, ref oMissing);
                    doc = null;
                }
                catch (Exception ex)
                {
                    strBuilder.Append(wordFile.FullName + " " + ex.Message);
                    System.Console.WriteLine(wordFile.FullName + " " + ex.Message);
                }
                // word has to be cast to type _Application so that it will find
                // the correct Quit method.
             
            }
            ((Microsoft.Office.Interop.Word.Application)word).Quit(ref oMissing, ref oMissing, ref oMissing);
            word = null;
            File.WriteAllText(@"E:\convert-" + fileType + ".txt", strBuilder.ToString());
            System.Console.WriteLine("finish");
            System.Console.ReadLine();
        }
        static void convertPpt()
        {
            // Create a new Microsoft Word application object
            Microsoft.Office.Interop.PowerPoint.Application word = new Microsoft.Office.Interop.PowerPoint.Application();

            // C# doesn't have optional arguments so we'll need a dummy value
            object oMissing = System.Reflection.Missing.Value;

            // Get list of Word files in specified directory
            DirectoryInfo dirInfo = new DirectoryInfo(@"E:\copy");
            dirInfo = new DirectoryInfo(@"E:\copy\hệ điều hành_đỗ văn uy_dhbkhn\lecture");
            string fileType = "pptx";
            FileInfo[] wordFiles = dirInfo.GetFiles("*." + fileType, SearchOption.AllDirectories);
            System.Console.WriteLine("total " + wordFiles.Length);
            int count = 0;
            //word.Visible = false;
            //word.ScreenUpdating = false;
            StringBuilder strBuilder = new StringBuilder();
            foreach (FileInfo wordFile in wordFiles)
            {
                Presentation doc = null;
                try
                {
                    // Cast as Object for word Open method
                    Object filename = (Object)wordFile.FullName;

                    strBuilder.Append("start " + count + "/" + wordFiles.Length + " " + wordFile.FullName + Environment.NewLine);
                    System.Console.WriteLine("start " + count + "/" + wordFiles.Length + " " + wordFile.FullName);
                    doc = word.Presentations.Open(wordFile.FullName, MsoTriState.msoFalse, MsoTriState.msoFalse, MsoTriState.msoFalse);
                    //word.Activate();

                    string outputFileName = wordFile.FullName.Replace("." + fileType, ".pdf");
                    object fileFormat = WdSaveFormat.wdFormatPDF;
                    Microsoft.Office.Interop.PowerPoint.PpSaveAsFileType targetFileType = Microsoft.Office.Interop.PowerPoint.PpSaveAsFileType.ppSaveAsPDF;

                    // Save document into PDF Format
                    doc.SaveCopyAs(outputFileName, targetFileType, MsoTriState.msoCTrue);

                    strBuilder.Append("end " + count + "/" + wordFiles.Length + " " + wordFile.FullName + Environment.NewLine);
                    System.Console.WriteLine("end " + count + "/" + wordFiles.Length + " " + wordFile.FullName);
                    count++;
                    object saveChanges = WdSaveOptions.wdDoNotSaveChanges;
                    //doc.Close();
                    //((_Document)word).Close(ref saveChanges, ref oMissing, ref oMissing);
                }
                catch (Exception ex)
                {

                    strBuilder.Append(wordFile.FullName + " " + ex.Message);
                    System.Console.WriteLine(wordFile.FullName + " " + ex.Message);
                }
                finally
                {
                    if (doc != null)
                    {
                        doc.Close();
                        doc = null;
                    }
                }
            }
            File.WriteAllText(@"E:\convert-" + fileType + ".txt", strBuilder.ToString());
            // word has to be cast to type _Application so that it will find
            // the correct Quit method.
            ((Microsoft.Office.Interop.PowerPoint.Application)word).Quit();
            word = null;
            System.Console.WriteLine("finish");
            System.Console.ReadLine();

        }
    }

}

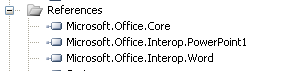
//add reference